页面

2016年9月18日星期日

How OBDSTAR X300 PRO3 add 2016 Cadillac CT6 key when all key lost?

General speaking, OBDSTAR X300 PRO3 key master SKP900+ Odometer adjustment+ EEPROM/PIC+ OBDII function. As to its powerful basic key programming function, this blog will show you how X300 PRO3 add 2016 Cadillac CT6 key when all key lost as an example.

First, Start OBDSTAR X300 PRO3 key master. Choose these items in this order:
“Vehicle”→ “Immobilizer”→ “Basic”→ “GM” → “GM V30.44” → “IMMO/ Remote” → “Cadillac” → “CT6” → “Immobilizer” → “2016”→ “All Key Lost”.


Next, Press the Start button once. Put the smart key into the card slot then take other smart key out of the car. Press “Enter” button to continue. After that turn the ignition off and wait.

Then, Input security code, press “Enter” button to verify. Wait about 12 minutes for configuring the system.

It will show “Erase success”, press “Enter” button continue.

Last step, Press the start button and press “Enter” button. Now OBDSTAR X300 PRO3 successfully add a new smart key for Cadillac CT6 2016! It will ask if you want to program next key. If yes, go on and the steps are similar. If no, stop here and exit the system.
http://obdstar-series.blogspot.com/2016/09/how-obdstar-x300-pro3-add-2016-cadillac.html

2016年9月13日星期二

OBDStar X300 Pro3 User Manual

OBDStar x300 pro 3 car list:
http://www.eobdtool.co.uk/upload/pro/obdstar-x300-pro3-testable-car-models.zip
Statement
This handbook is the manual of X300 Pro3. Without the written permission from the manufacturer, any company or individual shall not copy or backup it in any form (electronic, mechanical, photocopying, recording or otherwise).This manual is only operating instructions for X300 Pro3. If any result caused by using it on other equipment, the company does not assume any responsibility for it.
If not quality problems of X300 Pro3,such as equipment failure caused by user abuse or misuse, unauthorized disassembly, repair equipment yourself, not operate or maintain by the instructions,
lose it, the repair will not be free. Other product names mentioned in this manual are in order to
describe how to use X300 Pro3, and their copyrights are still observed by the original company.
X300 Pro3 and files are used for normal vehicles maintenance. If used for illegal purposes, the
company does not assume legal responsibility.
OBDStar X300 Pro3 User Manual
Content
Chapter 1 : Summary…………………………………………………………………………………………………………………1
1.1 Features…………………………………………………………………………………………………………………………1
1.1.1 Advantages…………………………………………………………………………………….1
1.1.2 Durability………………………………………………………………………………………..1
1.2 Introduction of the device……………………………………………………………………....2
1.2.1 The main unit and accessories………………………………………………………….2
1.3 Hardware technical specification………………………………………………………………3
1.4 Functions Setting……………………………………………………………………………………..3
1.4.1 Functions Selection…………………………………………………………………………4
1.4.2 System Setting……………………………………………………………………………….4
1.4.2.1 Language Selection……………………………………………………………. 4
1.4.2.2 Contrast Adjustment……………………………………………………………5
1.4.2.3 Font Setting………………………………………………………………………5
1.4.2.4 Metric/Inch……………………………………………………………………….. 1.4.2.5
Data Logging…………………………………………………………………….. 1.4.3
System Information………………………………………………………………………5
1.4.4 Device Self-test………………………………………………………………………6
Chapter 2: How to update software for X300 PRO3……………………………………………6
2.1 Update Tool software Installation………………………………………………………….7
2.2 Software Updating……………………………………………………………………………….8
Chapter 1: Summary
1.1.Features
1.1.1. Advantages
●Multi-language environment can be applied in different countries and
regions.
●The main unit system adopts ARM high speed chip to keep it running
fast, stable and anti-jamming.
●Updating via SD card at any moment.
●Modern design and high-definition true color screen realize the
integration of automotive industry and electronic information technologies and make
auto diagnosis and key programming easier, practical and economical. 1.1.2 Durability
●Integrity structure design makes it crack resistance, shock resistance
and durable.
●Industrial design ensures the tool work stably under tough environment, such as high and low temperatures.
X300 Pro3 User Manual
1.2 Introduction of the device
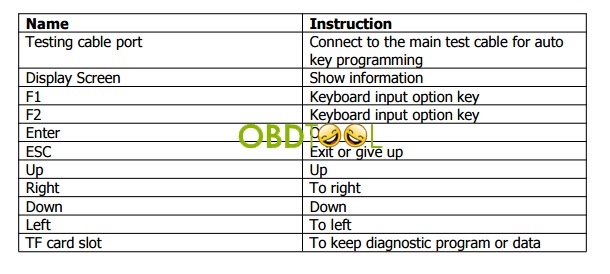
1.2.1 The main unit and accessories(Picture as below)
X300 Pro3 main unit

OBDStar x300 pro3 accessories

1.3 Hardware technical specification
★Dimension: 23.9cm(L)*12cm(W)*3.6cm(H)
★CPU :ARM7
★Power Supply:DC12V
★Operation Power:DC12V
★Operation Temperature: -20~60℃
★Display Screen:320*240 TFT Screen 1.4 Functions Setting Power on,and then press ENTER on the screen,then go to the function setting, setting information as shown below:

1.4.1 Function Selection
Select different functions according to different requirements

Note: Software numbers and functions are different according to different product configuration. Further detailed information, please contact your distributor.
1.4.2 System Setting
Select System Setting, language and contrast can be adjusted, as shown below:

1.4.2.1 Language Selection
This device supports English

1.4.2.2 Contrast
According to the environment, adjust the brightness of the screen by the left and right buttons, as shown below:

1.4.2.3 Font Setting
According to requirement, select different font.

1.4.2.4 Metric/Inch
According to different requirements, select the Metric/Inch by the up and down keys, and press ENTER to confirm as show below:

1.4.2.5 Data Logging
X300 Pro3 User Manual Any problems during testing, please use the Data Logging function to record the test process and send the data to us. Select ON by the up and down keys and press ENTER to confirm, shown as below:

Note: Every time you need to select ON if you want to record the data before testing car.
1.4.3 System Information
System information includes product serial number, hardware version, software version, release date, register password, etc.

1.4.4 Device Self-test
Device self-test includes screen display, keyboard testing. hardware self-testing, etc. If it cannot show enough pictures on the screen, keyboard not work, and hardware self-test not get through, please return this X300 Pro3 to the manufacturer.


Porsche Cayenne 2008 change km, OBDSTAR X300M or X300 PRO3?

Puzzles from a customer:
I just wanna change mileage for my Porsche Cayenne 2008. Sounds many tools in http://www.eobdtool.co.uk/ are available, like OBDSTAR X300M and X300 PRO3. Which one should choose? To save more and to perform that as easy and quick as possible.
Eobdtool customer service:
Hi, we advise you to select OBDSTAR X300M. It’s designed for IMMOBILIZER (key programming) and OBDII (basic diagnosis). Also, your Cayenne 2008 is listed in is vehicle list. Moreover, X300M is a new product made by OBDSTAR, which adopts ARM high speed chip to keep it running fast, stable and anti-jamming.
If just for mileage adjustment, OBDSTAR X300M is an ideal choice for you, i bet.
Ps. OBDSTAR X300M vs. X300 PRO3
-- OBDSTAR X300M for €209
OBDII+Odometer Adjustment


Full Configuration with Immobiliser+Odometer Adjustment+EEPROM/PIC+OBDII+EPB+Oil/Service reset+Battery matching
How to change mileage on Cayenne 2008?
Part 1: change mileage with OBDSTAR X300 M
Part 2: change mileage with OBDSTAR X300 PRO3
Part 1 - change mileage with OBDSTAR X300 M
the dashboard of Cayenne 2008

the current mileage: 2345744km
note: check connection of the car and X300 M
here goes to Cayenne odometer correction.
select VEHICLES->MILEAGE ADJUSTMENT->PORSCHE->PORSCHE V30.12


->initializing...
->authorizing...
select Cayenne->Cayenne -2009->MILEAGE ADJUSTMENT


->communication...
->enter a file name to save, here 11100000

input value: 11100000

X300M programmer managed to read the current mileage of 234560 (error does not exceed 10km)

->input new mileage: 345430

input value: 345430

->adjusting mileage...
->adjustment complete

the dashboard displays the new mileage as what is set just now

Cayenne change km SUCCESS.
Part 1 - odometer correction with OBDSTAR X300 pro3
connect X300 PRO3 to the obd port on the car
communication...

input the file name to save: 11000000

then X300 PRO3 displays the input value 11000000
X300 PRO3 programmer read the current mileage: 1122008km (error does not exceed 10km)


input the new mileage for km change: 12345


X300 PRO3 is adjusting the mileage...

milege adjustment complete

Cayenne displays the new mileage on the dashboard

obdstar x300 pro3 change mileage SUCCESS!

This is from EOBDTOOL website technical support: Porsche Cayenne 2008 change km, OBDSTAR X300M or X300 PRO3?

2016年9月8日星期四

OBDSTAR EEPROM PIC adapter tested ok with X100 pro and X300 pro

New update news:
OBDSTAR EEPROM adapter is newly added with PIC adapters & cables and verified working fine with OBDstar X100 pro/ X-300PRO to read write CPU data on a part of car computer. And now it is called OBDSTAR EEPROM PIC 2-in-1 adapter. As known, the EEPROM is used to read out password from EEPROM chip and restore data.

PIC adapter workable car models (05-26-2016 update):
Initialize CPU data for immobilizer coil on FAW Vios V5(PIC)
Initialize CPU data for immobilizer coil on FAW N5 (FREESCALE)
Initialize CPU data for immobilizer coil on FAW N7 (FREESCALE)
More car models are under development.
Why immobilizer coil needs to be initialized?
Take FAW Vios V5 (Immobilizer coil model is 89783-52Q40) and FAW N5/N7 (Immobilizer coil model is 89783-TBA00) for example, if their keys are lost, the 4S tend to replace new immobilizer coil then match key, usually a immobilizer coil cost about $50-$85. However, our OBDSTAR PIC adapter is designed to initialize adapter without replacing immobilizer coil, you just directly match new key after immo coil initialization. Besides, PIC adapter is able to initialize immo coil for unlimited times, which will help car owner save the new immobilizer coil cost and also time cost.
EEPROM adapter workable car models and corresponding function:
Can read/write/save/restore data for following group of chips:
24C01/02/04/08/16/32,
93C46/56/66/76/86
25010/020/040/080/160/320/640/128/256
95010/020/040/080/160/320/640/128/256
Can read out IMMO code for following car models:
Beiqi E150, E130
Buick Sail, Hideo new GL8, LaCrosse after 09, Regal after 09 and Ang Kela
Cadillac SLS and SRX
Changan CM8, Yue Xiang, Zhi Xiang and Benben
Changhe
Chery SIIC Transportation and DIAS
Chevrolet Cruze and TRAX
Chrysler
Citroen Elysee
Dflz DIAS
Dfpv S3
Geely Dorsett /Vision
Great Wall Wingle (diesel)
Hafei
FAW Haima Automobile 323 and DIAS
Hawtai DIAS
Huapu
MG MG3
Jiangling Landwind
Liebao
Skoda
Volkswagen
ZNA
Zotye
Note: Need to remove EEPROM chip to read out code.
How PIC adapter work with OBDstar X-300PRO and initialize immo coil on FAW Vios V5?
FAW Vios V5 key lost and firstly need to initialize immo coil, the procedure shown as follows:
1.Remove immobilizer coil from ignition switch, model: 89783-52Q40

2.Take apart immobilizer coil and then connect to the PIC adapter, there are two optional methods:
(1). Directly to connect


(2) Take apart the chip to weld:
Take apart the 14pin chip from immobilizer coil, then weld to the NO.2 PIC adapter. (Any one of following 4 welding position is ok).

3.Connect well X-300 Pro main unit, adapter and No.2 PIC adapter, and then supply power. Press menu to enter: Function – EEPROM adapter- PIC/ Freescale – FAW- Vios V5.
4.Initialization, wait until it finish.
5.After initialization, install immo coil back to the car, start to match key, procedure as follows:
Match 2 keys:
1.Insert a new key into ignition lock, wait 5 seconds (Note: just insert key to OFF position, not turn to ON position)
2.Insert the second new key into ignition lock, wait 5 seconds (Note: just insert key to OFF position, not turn to ON position)
3.Take out the second key from ignition lock, then insert one key that programmed into the ignition, quick turn on and off ignition for 5 times, immo light turn off, program done.
4.After key programming done, it needs to synchronize engine and immobilizer. Procedure as follows: connect X300 PRO to the vehicle, enter X300 pro IMMO remote match – FAW Vios V5 – Engine and immobilizer synchronization – type.
5.Synchronization complete.
Done.